How to link Custom Frameworks from your Xcode Projects
In order to use the functionality of Remoting SDK or Data Abstract (or any other framework, whether third party or created by yourself), you will need to link your application against the framework in question, and deploy the framework along with your application. There are two common ways to do this, either by referencing the pre-compiled framework directly or, if available, by referencing the project that represents the framework.
Linking Frameworks
Unless you are working on and making frequent changes to the frameworks themselves, the easiest way to link frameworks into your application is to just link against a recompiled version of them. For Remoting SDK and Data Abstract, the frameworks ships in pre-compiled form and ready to use, so unless you are applying custom changes to the code (which we recommend against), this is the best option for using RO and DA.
Adding Framework References
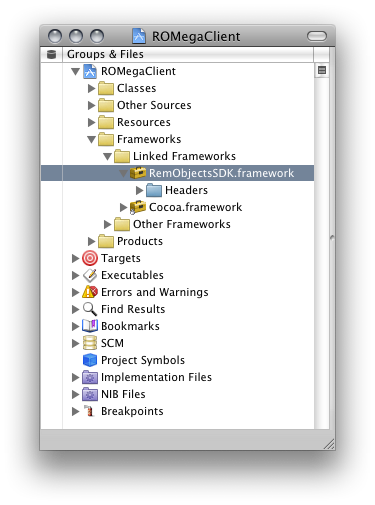
The first step for linking against a framework is to add a reference to the framework to your project. This can be done either my locating a framework folder (for example RemObjectsSDK.framework) in the Finder and dragging it into your project tree in Xcode, or by right-clicking the tree and choosing Add -> Existing Frameworks...
In theory, the framework references can be placed anywhere in your project hierarchy, but most projects have a Frameworks folder that provides a good default location.
Linking Frameworks into your Targets
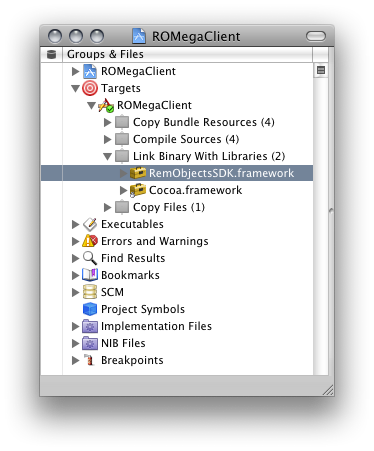
Once you have a reference to the framework(s) in your project, you can configure your targets to link to them. Usually, Xcode will perform this step automatically when you add references, but if you have multiple targets, or change framework references frequently, you will need or want to manually control this.
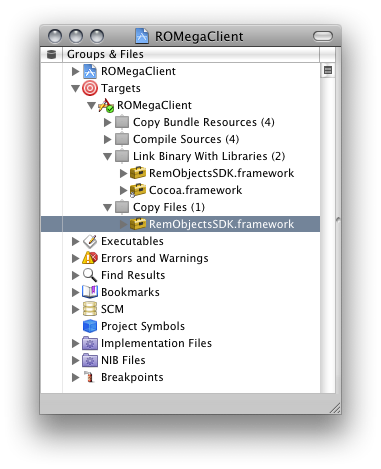
Linking a target to an already references framework is easy: simply drag the framework from your project hierarchy to the Link Binary with Libraries build phase for the target in question:
Once these two steps are set up, you can start to code against your framework, for example by including header files provided by the frameworks, using
#import <FrameworkName/HeaderFileName.h>
Most frameworks, including Remoting SDK and Data Abstract, provide a compiled header file, named after the framework, that pulls in all the individual headers. So all you need to gain access to the entirety of the framework is to import, say, <RemObjectsSDK/RemObjectsSDK.h>. Since third party framework headers seldomly change during your normal develop/build/text routine, it is a good idea to add this #import to the Pre-Compiled Header (.pch) file of your project, rather than to individual source modules. This way, framework headers will not need to be reparsed for each and every build, drastically increasing your build turnaround time.
We're almost done but there's one last step:
Deploying Linked Frameworks
When you link your project against a framework, your application binary will contain calls to classes and functions provided by the framework, but it will not automatically include a copy of the framework. As a result, when you run your application, it would fail because it cannot locate a copy of the framework(s) it needs to function.
For your application to run properly and independently, you will need to set your project up to deploy the framework you are using as part of the application bundle that is being generated when you build.
Note: alternatively, you could also choose to install used frameworks in well-known system-wide locations, such as /Library/Frameworks or ~/Library/Frameworks, but there are several downsides to this approach. For one, deploying frameworks to these folders requires you to deploy your application via an installer package, rather than a standalone .app that will "just work". For another, as frameworks evolve over time, there is a high risk of version conflicts if multiple applications expect different versions of a given framework in the same folder.
For these reasons, Remoting SDK and Data Abstract are pre-configured to be deployed as part of the .app bundle, and we strongly advice against trying to deploy the frameworks system-wide.
Luckily, setting a framework up for deployment inside the .app bundle is easy.
The first step is to right-click your target, and add a new Copy Files build specifically for frameworks.
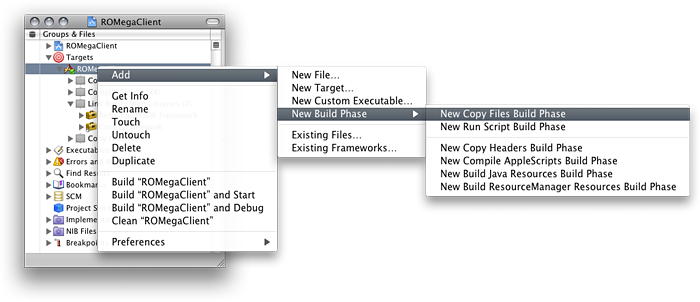
Note: A single build phase can be used for multiple frameworks, so if you already have other frameworks in your project that are deployed, you can skip this step; however, do not mistake this build phase with other phases that might be set up to copy non-framework files (such as Resources), as each Copy Files build phase will target a specific directory inside the .app bundle.
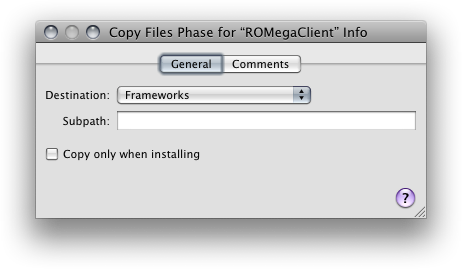
Once the build phase has been added, right-click it and choose Get Info (or press Cmd-I) and set the Destination to Frameworks. This will tell Xcode to copy any files added to this build phase to the /Contents/Frameworks folder of the .app bundle, where frameworks will be expected to reside*.
As the final step option-drag the frameworks form the Link Binary with Libraries build phase down to your new Copy Files phase (holding the option key will make sure the info is copied to the new location; accidentally dragging without the option key you move the framework, essentially removing it from the Link Binary with Libraries phase – and we do not want that.
And that is it - your application is good to go.
Linking Projects
Sometimes you are in a situation where a framework you are using is changing frequently. Maybe you are debugging (or even writing) the framework as part of the application project you are compiling, so you want to be able to seamlessly switch between making changes to framework and application, and have both automatically rebuilt when you run your app.
This can be achieved by referencing the project for your framework, rather than the pre-compiled binary version, in your application project, as the following steps outline.
Adding Project References
Just like direct framework references, references to secondary projects can be added to your Xcode project either by dragging the .xcodeproj file into your project tree or by right-clicking your project and choosing Add -> Existing Files... and browsing for your project (make sure that when the conformation dialog for adding the project pops up, the Copy items into destination option is unchecked. After all, you want to reference the framework project from its existing location).
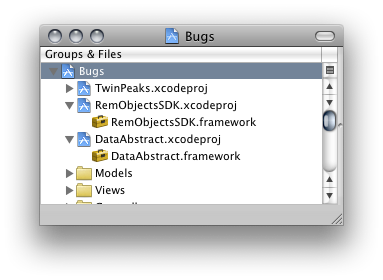
As you see, rather than having the yellow tool-chest framework icon, the referenced projects are using the regular blue Xcode icon, with the actual framework they represent being shown nested underneath. (If a referenced project has not been built yet, the framework will show it as missing, using red text, until you build.)
Configuring Dependencies
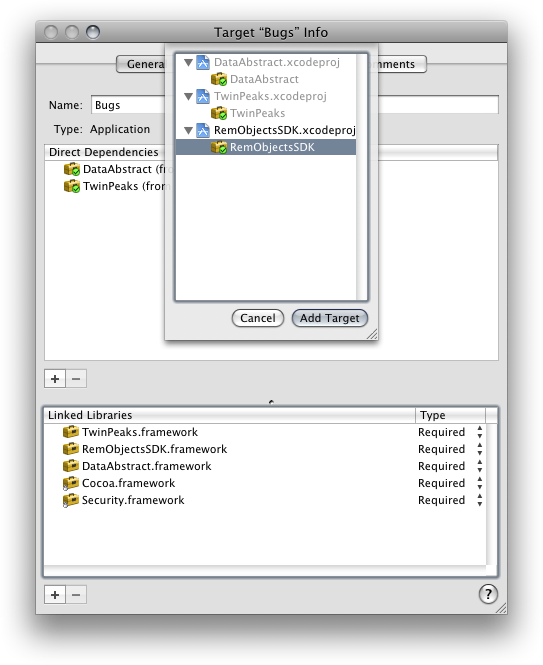
There's two more things that need to be set up, before our two (or more) projects work together perfectly. The first is to set up project dependencies, to let Xcode know that our main project depends on the referenced projects, and that those should be rebuilt if they changed. To do this, right-click your application's target and choose Get Info (or press Cmd-I)
On the general tab, click the + button for the top list and select the framework or frameworks that your project depends on. Click Add target to complete the action.
Finally, you will need to configure the build folders for all projects (your application and all framework projects you want to work with) to match. It's unclear whether this is by design or an Xcode bug, but unfortunately project dependencies will only work consistently if all projects are set to build into the same base folder (opposed to their unique /build/Debug sub-folders).
So as a final task, right-click the root project node (the one showing the name of your project, Bugs in the above screenshot) and choose Get Info (or, once again, press Cmd-I). In the resulting info pane, change the Place Build Products In option from the default to Custom Location and type in or select a folder of choice where you want all your products to build to:
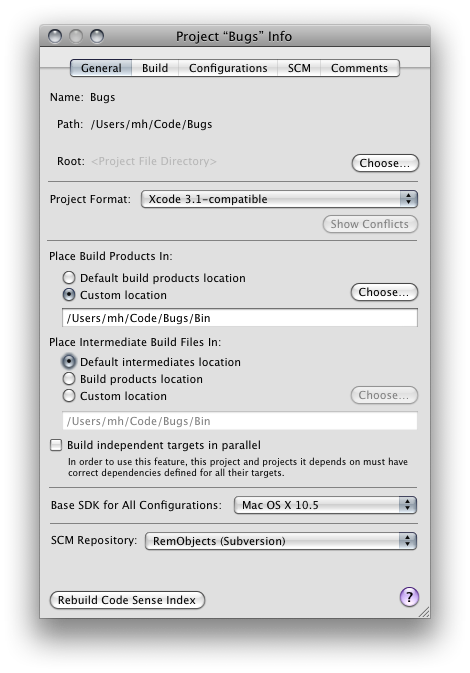
As you can see, the location for intermediate files will adjust automatically, there is no need to manually fix that as well.
Note: If you find that Xcode does not catch up with changes you make to the frameworks, does not property rebuild, or you see old behavior when running your apps, chances are that the build folder setting is not configured consistently for all projects, and Xcode is linking in older versions of the projects. It can help to do a Clean All on the projects, and also manually go and delete and /build folders within the project folders, to make sure the only copy of your framework Xcode can find is the right one, in the folder you specified above
Linking and Deploying
With the above steps completed, you can now set up your target to link and deploy the frameworks, just as you have seen in the first part of this article. Once that is done, you are all set to develop and debug your main project and the framework(s) it depends on, together.