How to write a Server (.NET)
This article explains how to create your first Remoting SDK server in Visual Studio. There is an associated article (How to write a Remoting SDK Client (.NET)) which shows how to build a client to access this server.
Note: if you are also interested in the Delphi version of these articles, see How to write a Remoting SDK Server (Delphi) and How to write a Remoting SDK Client (Delphi).
There is also How to write a Remoting SDK Client (JavaScript).
Two ways to define a server
Remoting SDK lets you define a server in two ways, and the only real difference is how the service contract is described:
- Code-First. You define your services purely in code — an ordinary class with a couple of attributes — and there is no
.RODLfile to maintain. It is the default mode for new server projects since Remoting SDK 9. See Code-First Servers. - Classic RODL-based. You define the contract in a
.RODLfile using the Service Builder, and Remoting SDK generates proxy/invoker code from it. This mode is fully supported and is a good fit if you prefer designing the contract visually or are maintaining an existing RODL-based server.
To the outside, both produce an identical server — a Code-First server generates the same RODL at runtime — so a client cannot tell the difference. Pick whichever fits how you like to work. This walkthrough covers the Code-First path first, then the classic RODL-based path.
Creating a Code-First server
Creating the project
In Visual Studio, choose File → New → Project. In the template picker, narrow the list down using the language/platform filters (here: C#, All platforms) and type or select Remoting SDK. Several Remoting SDK Server templates appear, each based on a different hosting model.
For a Code-First server pick Remoting SDK Server, ApplicationServer-based — a code-first Remoting SDK Server project that can run on .NET Core, using the ApplicationServer-based server hosting model — and click Next.
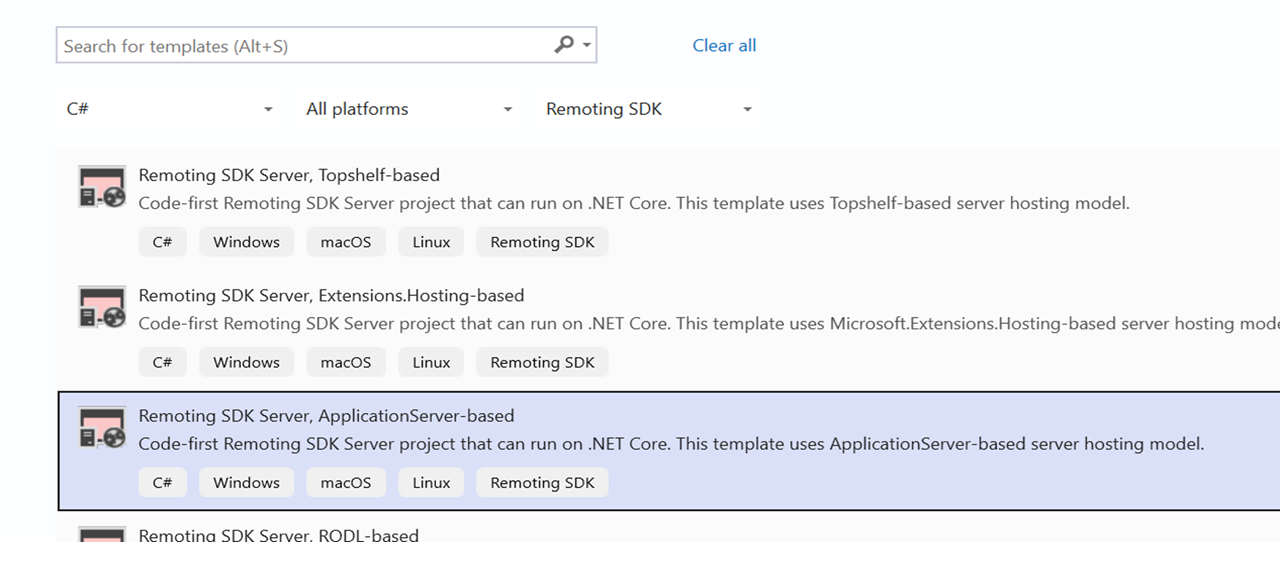
On the next page give the project a name (this article uses MyServer) and click Create. The template generates a complete, ready-to-run server project.
What the template generates
The generated project is a .NET console application (targeting net8.0) that hosts your services and references the RemObjects.SDK.Server package. The key files in the Solution Explorer are:
Program.cs— the host that creates and starts the server.Service1.cs— a sample service, defined entirely in code with the[Service]attribute. This is where you write your service methods.LoginService.cs— a sample authentication service exposingLogin/Logout.Service1.Designer.cs,LoginService.Designer.cs— designer partials that wire up the component container; you normally do not edit these.
The host (Program.cs)
The server is hosted by the ApplicationServer class. The default Program.cs creates it, leaves a number of optional settings (TLS, port, channel) commented out, and runs it:
using RemObjects.SDK.Server;

internal static class Program
{
    public static int Main(string[] args)
    {
        ApplicationServer server = new ApplicationServer("MyServer");

        // Optional setup (TLS, custom channel, port) is available here, e.g.:
        //server.NetworkServer.ServerChannel = new IpSuperHttpServerChannel();
        //server.NetworkServer.Port = 8099;
        //server.NetworkServer.UseTLS = true;

        server.Run(args);
        return 0;
    }
}
By default the server listens on port 8099 (uncomment and change server.NetworkServer.Port to use another port). The commented TLS block shows how to enable traffic encryption and supply a certificate; for handling self-signed certificates on the client side see Handling Self-Signed Certificates.
The sample service (Service1.cs)
This is the heart of a Code-First server. The service is an ordinary class deriving from RemObjects.SDK.Server.Service, marked with attributes that make it remotable:
using RemObjects.SDK.Server;

[Service, ServiceRequiresLogin]
public partial class Service1 : Service
{
    public Service1()
    {
        this.InitializeComponent();
    }

    //Implement your actual service methods here.

    [ServiceMethod]
    public string DoSomething(string someValue)
    {
        return someValue.ToUpper();
    }
}
Two attributes do all the work:
[Service]marks the class as a remotely callable service.[ServiceMethod]marks each method you want to publish; methods without it stay internal to the server.
The template also applies [ServiceRequiresLogin] to Service1. This means a client must authenticate (through LoginService below) before it is allowed to call DoSomething — otherwise the call is rejected at runtime. If you want the service to be callable without a login, simply remove that attribute. See Authentication and Login for details, and Defining Code-First services (.NET) for the full list of supported types and optional attributes.
The login service (LoginService.cs)
The template also includes a sample LoginService that backs the [ServiceRequiresLogin] requirement above:
[Service]
public partial class LoginService : Service
{
    public LoginService() => this.InitializeComponent();

    [ServiceMethod]
    public bool Login(string username, string password)
    {
        //Provide proper logic to validate the user's credentials
        bool loginValid = username == password;

        if (loginValid)
        {
            Session["Username"] = username; // create a session
            return true;
        }
        else
        {
            DestroySession();
            return false;
        }
    }

    [ServiceMethod]
    public void Logout() => DestroySession();
}
Login validates the credentials (the placeholder logic simply accepts any call where username == password — replace this with your own check) and, on success, establishes a session by writing to Session. Logout tears the session down with DestroySession(). Once a session exists, the client may call the login-protected Service1.DoSomething.
Adding your own functionality
Adding a new operation to a Code-First server is just editing code — there is nothing to regenerate:
- Open
Service1.cs. - Add a
publicmethod to the class and mark it with[ServiceMethod]. - Make sure the parameters and the return type are among the supported data types.
That's it — Remoting SDK picks the method up automatically the next time the server runs.
For this first server there is nothing else to change; the sample DoSomething is enough to test the round-trip. Skip ahead to Running the server.
Creating a classic RODL-based server
If you prefer to design the service contract visually, or are working with an existing RODL-based project, pick the RODL-based template instead. Everything else (hosting, port, verification) is the same.
Creating the project
Follow the same File → New → Project steps as above, but in the template picker choose Remoting SDK Server, RODL-based — a template to create a RODL-based Remoting SDK Server project that can run on .NET Core — and click Next.
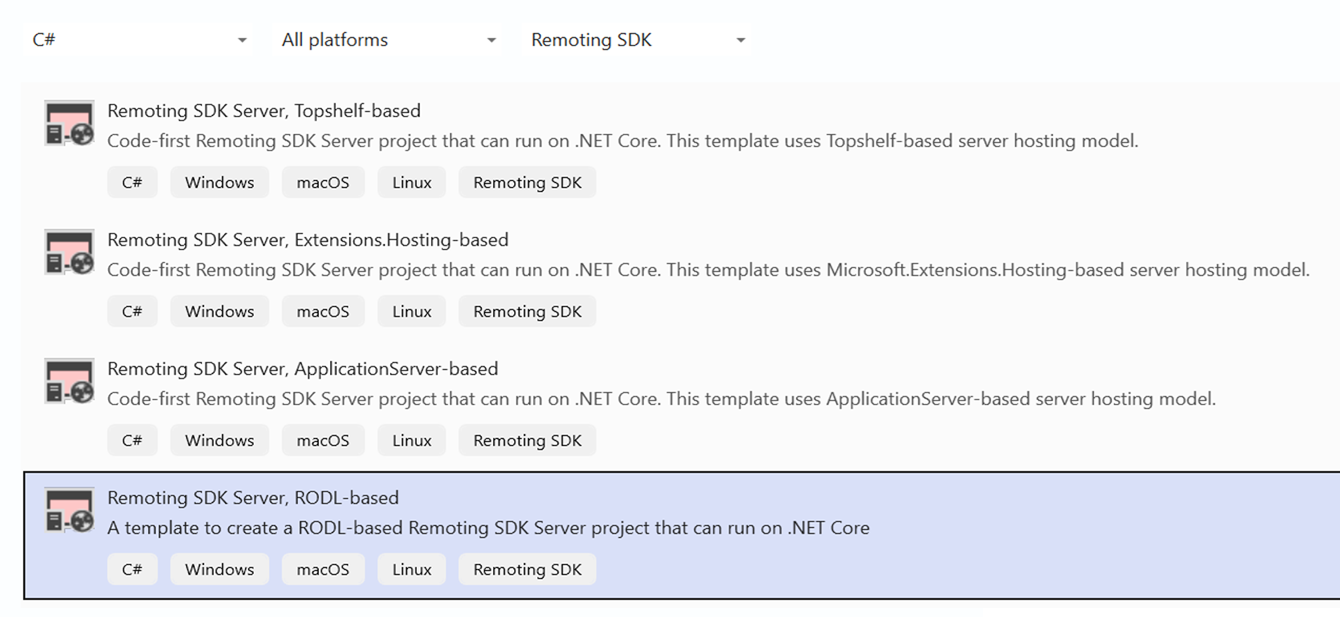
Give the project a name (MyServer) and click Create. There is no additional "New Remoting SDK Server" wizard — the template generates a complete, ready-to-run server project.
What the template generates
The generated project is also a .NET console application, but the contract lives in a RODL file and its generated companions:
MyServer.RODL— the RODL (RemObjects Definition Language) file that defines all services and data types the server exposes. The template ships with two sample services:Service1and aLoginService.MyServer_Intf.cs— generated proxy code (the interface a client uses to call the services).MyServer_Invk.cs— generated invoker (stub) code that dispatches incoming calls to your implementation without reflection, for better performance.Service1_Impl.cs,LoginService_Impl.cs— the implementation files. These are generated once and are where you write your own code; they are never overwritten afterwards.Program.cs— the host that starts the server (the sameApplicationServerhost shown above).
Implementing your service
Open Service1_Impl.cs. Each operation declared for Service1 in the RODL has a method here for you to implement. The template comes with one example method, DoSomething, already filled in:
[RemObjects.SDK.Server.Service(Name = "Service1", InvokerClass = typeof(Service1_Invoker), ActivatorClass = typeof(Service1_Activator))]
public partial class Service1 : RemObjects.SDK.Server.Service, IService1
{
    public virtual string DoSomething(string someValue)
    {
        return someValue.ToUpper();
    }
}
To add your own functionality you would:
- Open
MyServer.RODL(double-click it in the Solution Explorer) to edit the service contract in the Service Builder — add a method, its parameters and result. - Save; Visual Studio regenerates
MyServer_Intf.csandMyServer_Invk.csand adds a stub for the new method toService1_Impl.cs. - Fill in the implementation in
Service1_Impl.cs.
For this first server there is nothing else to change — the sample DoSomething is enough to test the round-trip.
Running the server
Whichever template you chose, press F5 (or Ctrl+F5) to build and run. The server starts as a console application that keeps running and listening for clients (you will see a Press Ctrl+C to terminate prompt). By default it listens on port 8099.
Verifying the server
A quick way to check that the server is up and to inspect what it exposes is to open a browser and request the server's service definition at:
http://localhost:8099/bin
The server responds with its service definition — a description of every service and operation it publishes (for a Code-First server this is the RODL generated at runtime from your classes). For our project you can see the sample Service1 with its DoSomething operation, alongside the LoginService:
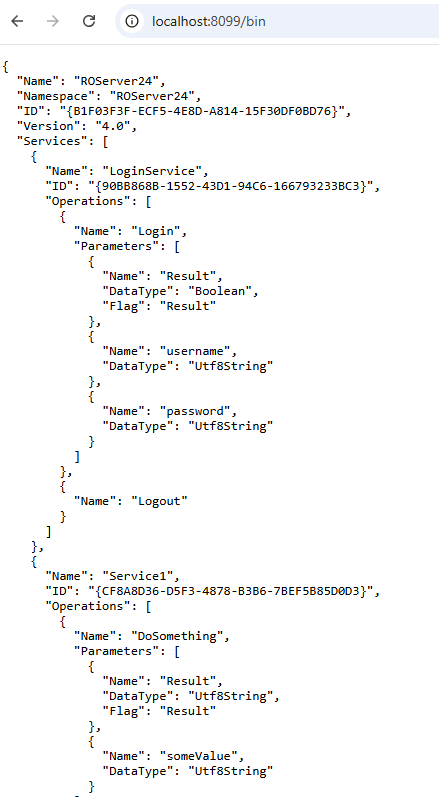
This confirms the server is running and ready to be used by Remoting SDK clients.
Next steps
Now it's time to create a client to access this service — see How to write a Remoting SDK Client (.NET).
To expose the same server to a browser-based client, see How to add a Remoting SDK for JavaScript Web Client to your Server (.NET).
To learn more about the Code-First model — converting existing RODL-based servers, defining structs/enums/exceptions in code, and debugging — see Code-First Servers.