Remoting SDK Server on Windows Azure
This article shows how to create and deploy a new Remoting SDK-powered server application for Windows Azure. It can also be useful for porting existing production applications in the Microsoft cloud.
Before we start, please make sure that you have installed all necessary tools and packages. Please visit Microsoft's Download Center for more info.
Windows Azure currently supports the following role types: Web Role, Worker Role and VM Role. Our choice is a Worker Role (we don’t use Web Role as we currently do not need IIS and ASP.net infrastructure to run the SDK Server).
To create a simple project, just perform the following steps (I’ve used VS2010, but Azure MSDN articles say VS2008 is supported as well):
- First of all, let’s create the simplest SDK client and server application. We can do it by using the template RemObjects SDK\Command Line Server:
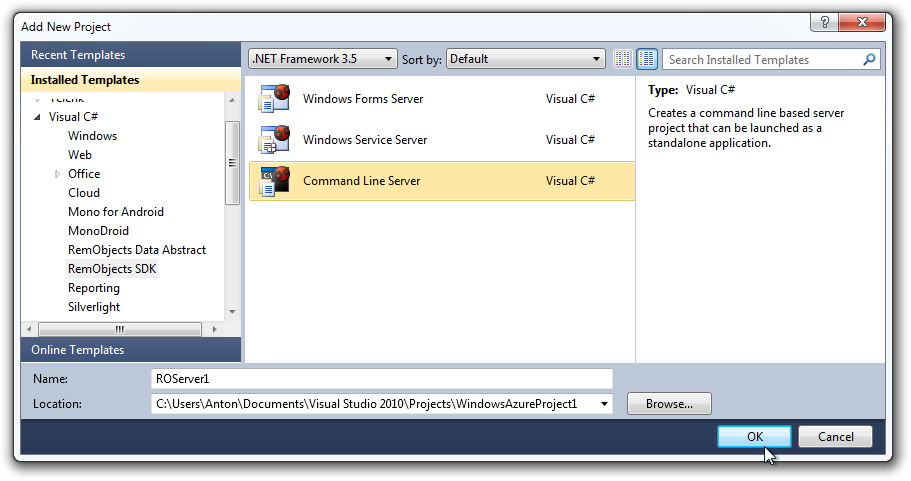
There is no need to create a WinForms Server, because we won’t use any user interface.
- In the wizard, leave all options in default and press OK. The wizard should generate the client and server application projects with an HTTP channel and the Bin message format.
Note:
We should add implementations of two operations that are defined in the RODL. To do this, open and close the RODL file, so the IDE can add other required files to the server project and then add the following code to the method implementation in the ...Impl.cs file:
public virtual int Sum(int A, int B)
{
  return A + B;
}
public virtual System.DateTime GetServerTime()
{
  return DateTime.Now;
}
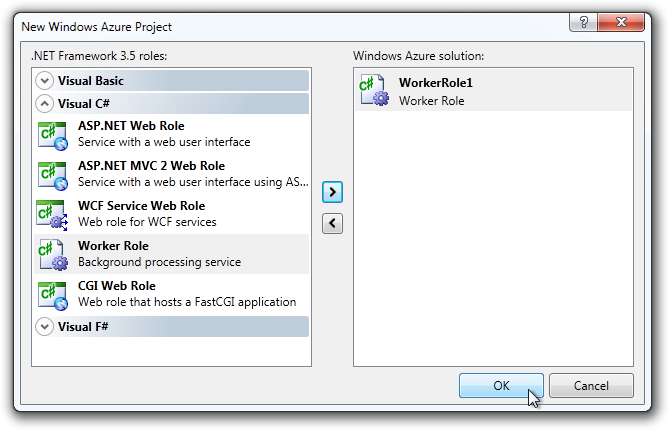
- Now we leave the created projects for a while and create the Windows Azure project. Add a Cloud\Windows Azure Project to the current solution.
- In the wizard, select only one Worker Role and press OK. The wizard will generate a Windows Azure project with two settings files (
ServiceDefinition.csdefandServiceConfiguration.cscfg)and the other WorkerRole1 project.
- Now we are going to port the ROServer project to the Worker Role project. There are different ways of doing this. One of them is to add a reference from the WorkerRole to the SDK Server project. To do this, you have to make some changes to both projects:
- In the RoServer project, open the
Main.csfile and add the following code:
class ROServerMain
{
  [STAThread]
  static void Main(string[] args)
  {
    //…
  }

  private static RemObjects.SDK.Server.IpHttpServerChannel serverChannel;
  private static RemObjects.SDK.BinMessage message;

  public static void Start(int aPort)
  {
    serverChannel = new RemObjects.SDK.Server.IpHttpServerChannel();
    serverChannel.Port = aPort;
    message = new RemObjects.SDK.BinMessage();
    serverChannel.Dispatchers.Add(message.DefaultDispatcherName, message);

    serverChannel.Activate();
  }

  public static void Stop()
  {
    serverChannel.Deactivate();
  }
}
We have added two static methods and introduced fields for the channel and message. We’ve also made the class public.
- Now, go to your Worker Role Project and add a reference to the RoServer1 project. Then open the WorkerRole.cs and change it like this:
public class WorkerRole : RoleEntryPoint
{
  public override void Run()
  {
    // leave unchanged
    // …
  }
  public override bool OnStart()
  {
    // Set the maximum number of concurrent connections
    ServicePointManager.DefaultConnectionLimit = 12;

    int port = RoleEnvironment.CurrentRoleInstance.InstanceEndpoints["SdkEndpoint"].IPEndpoint.Port;

    ROServer.ROServerMain.Start(port);
    Trace.WriteLine("Server activated", "Information");

    return base.OnStart();
  }

  public override void OnStop()
  {
    ROServer.ROServerMain.Stop();
    Trace.WriteLine("Server deactivated", "Information");
    base.OnStop();
  }
}
By using Start/Stop wrappers in the channel activation, we avoid referencing the SDK libraries in the Worker Role project.
Notice how we set the server port. We need to do so to deploy the application not in an emulator but in the real Azure Cloud. In Azure, all inbound communication happens via endpoints declared in ServiceDefinition.csdef. There are two types of endpoints: input and internal. Input endpoints are exposed to the internet, while internal endpoints are used for communication inside the application. The internal Endpoint should be configured for the SDK server (default port – 8099, port type – TCP, name - SdkEndpoint). You can set the endpoint up via the Visual Studio designer by double-clicking on the Worker Role and entering the Endpoints tab:

or you can edit the ServiceDefinition.csdef manually by adding this node:
<Endpoints>
  <InputEndpoint name="SdkEndpoint" protocol="tcp" port="8099" />
</Endpoints>
Also note that we are using the TCP type. You can read more about endpoints for servers in Azure here (Section Background: Endpoints in Windows Azure).
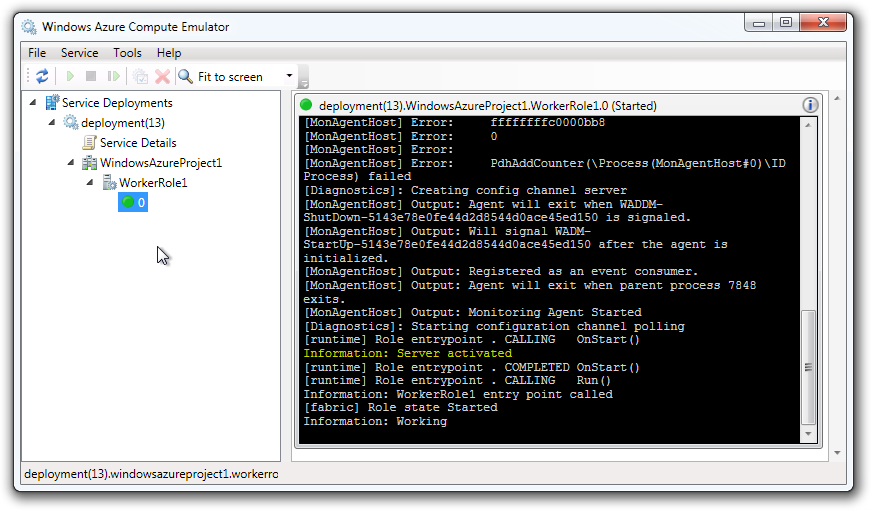
- Now all preparations have been done. Deploy your Azure project and start it. If you use an emulator, you will see the following result:
- Now you can add logic to the SDK client and direct it to the already deployed Service instance. Or you can just browse the RODL by pointing your browser to http://localhost:8099/rodl to see that the server is working. Feel free to use other channels and messages available in RemObjects SDK in the same way.
Summary
Another easy way to port your SDK server application into Windows Azure is just copying all source code files from an existing application to WorkerRole (except the UI code, of course). In that case, don’t forget to reference all SDK-related libraries.
In conclusion, as you can see from the article, there are no difficulties to porting RemObjects SDK Servers to WindowsAzure: it is similar to deploying WindowsService.