Sample Client
Add new Windows Forms project called ChatClient to the solution.
The first step is to add reference to the RemObjects.SDK assembly.
The next step is to import the server interface into the client. Each Remoting SDK server exposes metadata about published services and data types known as RODL
This metadata is used to generate proxy classes that can be used by the client applications to remotely call the service methods.
Select the client application project in the Solution Explorer. In the Visual Studio menu go to Extensions -> Connect to Remoting SDK Server… A RODL import dialog will appear:
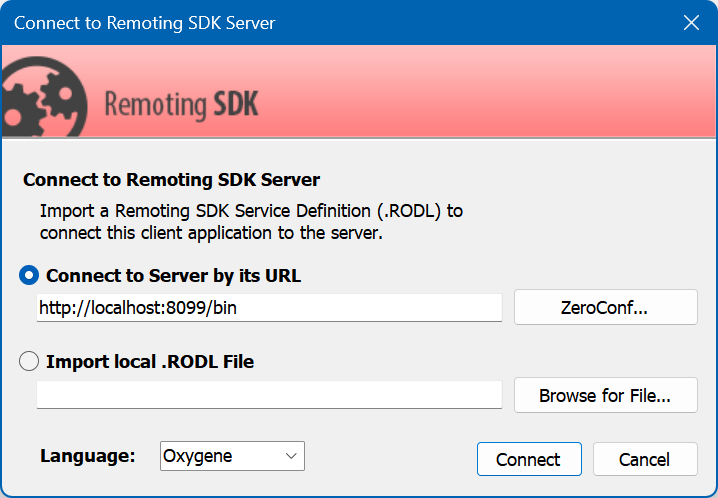
Press the Connect button. If the server application is running its RODL will be imported.
Three files will be added to the project:
- ChatServer.remoteRODL - a link to the imported RODL
- ChatServer_Intf.cs - file containing service proxies and data type definitions
- ChatServer_ServerAccess.cs - a scaffolding code for remote service access
Delete the ChatServer_ServerAccess.cs file because this tutorial will use own service access code.
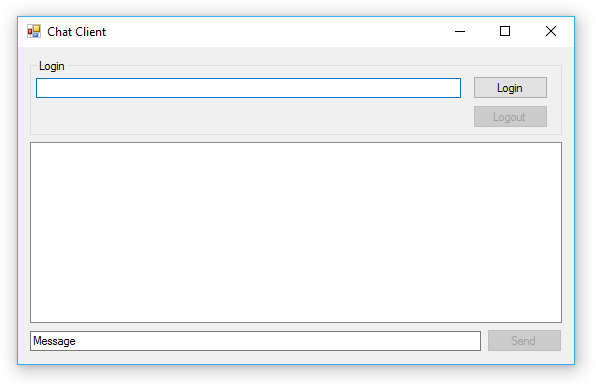
Open the Main form in design mode and add there a text box, 2 buttons for log in and log out, a list box for the chat log and a text box and a button to actually type and send the chat messages:
For this simple tutorial remote service access and UI logic will be mixed in the form code-behind code. Real-world applications should strictly separate them on different layers.
Add the following constant to the main form code-behind code:
private const string SERVER_URL = @"http://localhost:8099/bin";
Also add these field definitions:
private IClientChannel _clientChannel;
private IMessage _message;
private ILoginService_Async _loginServiceAsync;
private IChatService_Async _chatServiceAsync;
First two fields will contain references to the client channel and message instances, while latter two will contain references to the service proxies. In this tutorial asynchronous proxies will be used.
Add event handler for the form's Load event:
private void MainForm_Load(object sender, EventArgs e)
{
    this._clientChannel = ClientChannel.ChannelMatchingTargetUri(SERVER_URL);
    this._message = RemObjects.SDK.Message.MessageMatchingTargetUri(SERVER_URL);

    this._loginServiceAsync = new LoginService_AsyncProxy(this._message, this._clientChannel);
    this._chatServiceAsync = new ChatService_AsyncProxy(this._message, this._clientChannel);
}
This code needs some explanations.
At first instances of the client channel and message are created. This code uses helper methods to let the Remoting SDK infer concrete Client Channel and Message types based on the remote server URL.
Then two proxy classes are instantiated. Take note that they both use the same message and client channel instances. This is important to ensure that both service proxies will provide the same user identifier to the remote server, so the ChatService will be able to use the session created earlier by the LoginService.LogIn method.
The next step is to add the Login/Logout functionality. Add Click handlers to the Login and Logout buttons:
private async void LoginButton_Click(object sender, EventArgs e)
{
    string username = this.UserNameTextBox.Text;

    if (string.IsNullOrWhiteSpace(username))
    {
        return;
    }

    username = username.Replace("\"", "\"\"");

    this.Enabled = false;

    try
    {
        string loginString = string.Format("User Id=\"{0}\";Password=\"{1}\"", username, username);
        bool loginResult = await this._loginServiceAsync.LogInAsync(loginString);

        this.UserNameTextBox.Enabled = !loginResult;
        this.LoginButton.Enabled = !loginResult;
        this.LogoutButton.Enabled = loginResult;
        this.SendButton.Enabled = loginResult;
    }
    finally
    {
        this.Enabled = true;
    }
}

private async void LogoutButton_Click(object sender, EventArgs e)
{
    this.Enabled = false;

    try
    {
        await this._loginServiceAsync.LogOutAsync();

        this.UserNameTextBox.Enabled = true;
        this.LoginButton.Enabled = true;
        this.LogoutButton.Enabled = false;
        this.SendButton.Enabled = false;
    }
    finally
    {
        this.Enabled = true;
    }
}
This is a lot of Windows Forms code with just a several lines of Remoting SDK-related code:
This code line escapes the " quotes in the login data string:
username = username.Replace("\"", "\"\"");
This line actually composes the login data string:
string loginString = string.Format("User Id=\"{0}\";Password=\"{1}\"", username, username);
Note the ' quotes used in the login string. They ensure that given the quotes in the user name or password are properly escaped the login string won't be broken by username like aa"a;aa.
The code for sending out chat messages looks very similar:
private async void SendButton_Click(object sender, EventArgs e)
{
    string message = this.MessageTextBox.Text;

    if (string.IsNullOrEmpty(message))
    {
        return;
    }

    this.Enabled = false;

    try
    {
        await this._chatServiceAsync.SendMessageAsync(message);
    }
    finally
    {
        this.Enabled = true;
    }
}
Now start the client application, try to log in and send the messages. The messages will be displayed in the Visual Studio's design pane, but for now the chat is still not functional and the server has no ways to relay the message to connected users.
Next two chapters (for server and for client) will cover this functionality.
Current ChatClient code can be downloaded here.