Creating a new Remoting SDK Server
Remoting SDK provides templates to create .NET-based Remoting SDK Servers using Visual C# and Visual Basic projects, as well as the four Elements languages, Oxygene, RemObjects C#, Swift and Java.
Simply invoke the New Project Wizard, for example by choosing "New Project" from the "File|New" menu (or pressing ^⇧N). Select your language of choice and choose the "Remoting SDK" folder underneath it. (For the Elements languages, this will be nested under ".NET").
Several Remoting SDK Server templates are provided. For .NET Core you can pick a Code-First template based on your preferred hosting model – Topshelf-based, Extensions.Hosting-based or ApplicationServer-based – or a RODL-based template; matching (.NET Framework) variants are available as well.
Code-First is the default approach for new projects since Remoting SDK 9; the RODL-based templates remain fully supported – choose whichever fits your workflow.
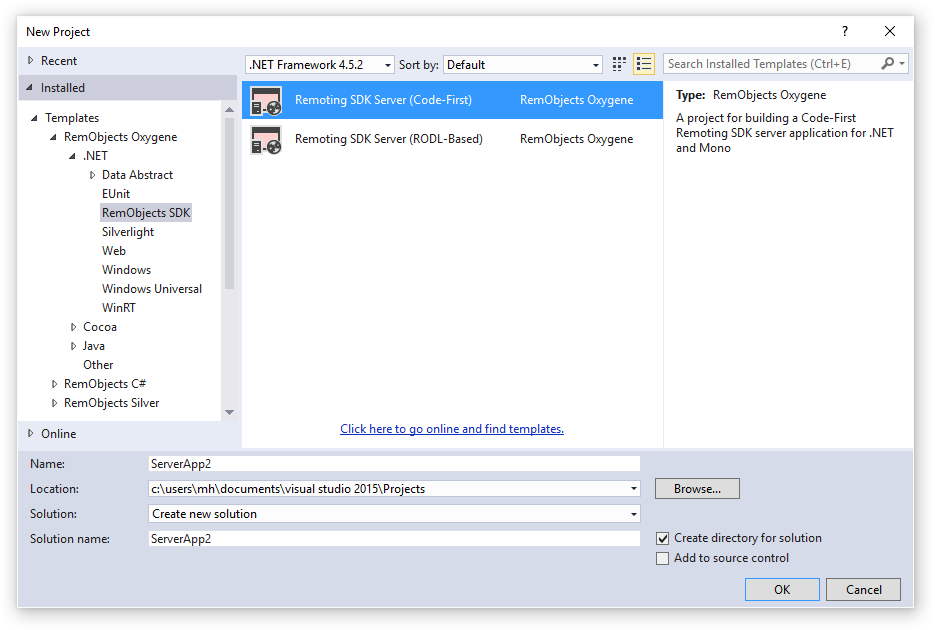
Select a name and destination folder for the new project, then click "OK", and a new solution will be created with your project:
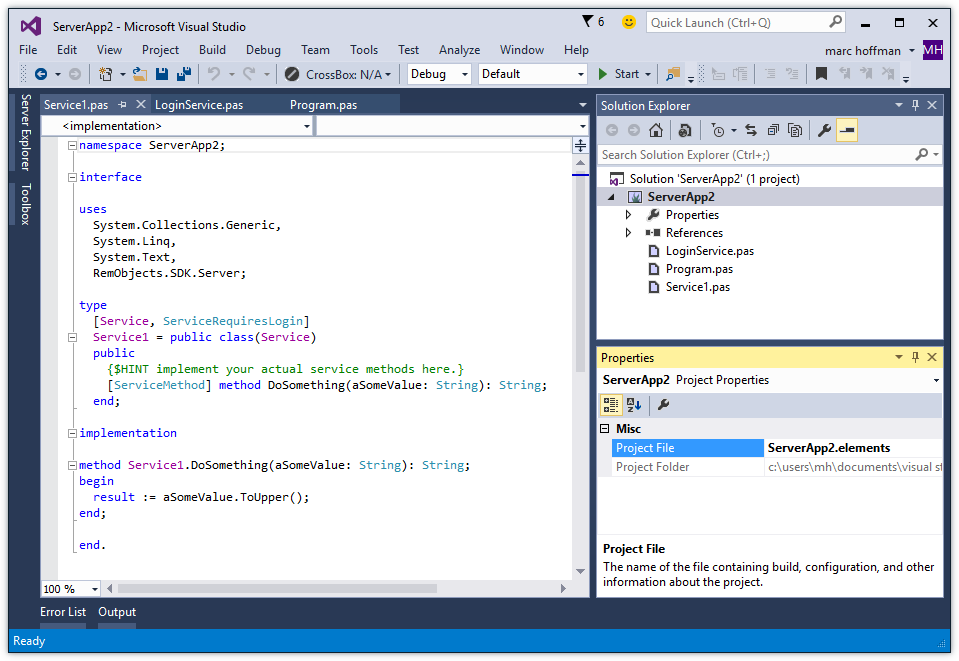
Aside from regular .NET plumbing code in the Properties folder, this project has three source files of interest:
Program
The Program source file contains your server's Main() entry point. This is where execution will start when your server app is run. By default, it will create a new ApplicationServer instance, optionally configure it, and call Run() to activate the server. The call to Run() will block and keep your app running until it gets terminated manually. Depending on your platform and how your app is invoked, Run() will automatically launch your server in the right mode – for example as Windows Service or UNIX daemon, or as standalone GUI or command line application. You can read more about this in the ApplicationServer topic.
In Fire, running your server app will use the command line mode by default; from Visual Studio it will run in windowed mode.
This is what the Main() entry point looks like:
var server := new ApplicationServer('MyServerApp');

// TLS
server.NetworkServer.UseTLS := true;
server.NetworkServer.AutoCreateSelfSignedCertificate := true;
//server.NetworkServer.CertificateFilename := '</path/to/certificate>';
//server.NetworkServer.CertificateName := '<certificate name>';

//server.NetworkServer.channel := new IpSuperHttpServerChannel();
//server.NetworkServer.Port := 8099;

server.Run(args)
ApplicationServer server = new ApplicationServer("MyServerApp");

// TLS
server.NetworkServer.UseTLS = true;
server.NetworkServer.AutoCreateSelfSignedCertificate = true;
//server.NetworkServer.CertificateFilename = "</path/to/certificate>";
//server.NetworkServer.CertificateName = "<certificate name>";

//server.NetworkServer.channel = new IpSuperHttpServerChannel();
//server.NetworkServer.Port = 8099;

server.Run(args);
return 0;
let server = ApplicationServer("MyServerApp")

// TLS
server.NetworkServer.UseTLS = true
server.NetworkServer.AutoCreateSelfSignedCertificate = true
//server.NetworkServer.CertificateFilename = "</path/to/certificate>"
//server.NetworkServer.CertificateName = "<certificate name>"

//server.NetworkServer.channel = new IpSuperHttpServerChannel()
//server.NetworkServer.Port = 8099

server.Run(C_ARGV.nativeArray)
ApplicationServer server = new ApplicationServer("MyServerApp");

// TLS
server.NetworkServer.UseTLS = true;
server.NetworkServer.AutoCreateSelfSignedCertificate = true;
//server.NetworkServer.CertificateFilename = "</path/to/certificate>";
//server.NetworkServer.CertificateName = "<certificate name>";

//server.NetworkServer.channel = new IpSuperHttpServerChannel();
//server.NetworkServer.Port = 8099;

server.Run(args);
return 0;
Service1
This file includes your first Service, with a dummy method, and all the right annotations to make the service public. The service is also marked as requiring a login (more on that below).
Chances are you will want to rename this service to something more sensible than Service1 and also change/replace the dummy method to add the actual functionality you want to expose.
LoginService
The LoginService is a second service added to your project by default to let your clients authenticate before accessing the other service(s).
This service implements a Login method that takes a username and password. To start with, it just compares the two and accepts any login where the username equals the password. It goes without saying that you will want to replace this with functionality that verifies actual user accounts using whatever login scheme you want to use (for example a users database, or an LDAP directory).
- You can read a lot more about this in the Authentication and Login topic, and you will also want to check out the topic on Session Management.
If you don't need authentication for your server, simply remove this class, and also remove the ServiceRequiresLogin attribute from Service1.
Running the Server
Simply build and run the project, and your server will be active on your local machine, on the default port 8099. To test it, open a browser window and enter https://localhost:8099 as address – you should see the welcome page of your server.
Configuring Your Server
You can change what Channel(s) and Message(s) your server is accessible under, either by changing the code in Program, or by adding a server configuration section to a *.exe.config file you place next to your server.
By default, the server will use the IpSuperHttpServerChannel (which is compatible with both SuperHTTP and regular HTTP clients), and the efficient BinMessage format. You can change this, or add more messages easily – for example adding SOAP support to allow access from third party clients that don't use Remoting SDK.
- Read more about Server Channels and Messages in the Concepts section
- Read more about Server Configuration here